Let's get coding
March 27th, 2020
By now your development environment should be set up and we are ready to start coding. I've thought long and hard about whether it's better to cover theory first and then move on to building real projects or to just jump in and build projects from the start, explaining the concepts as we go along. In my view it is much more effective to start building projects from the start.
What we will build
Now to get coding, we have to have something we will build. Here it is.

Why a login form? Well, it's something all of us get to do with on a daily basis. It is also a nice introduction to the basics of HTML and CSS.
In short, before we begin, just an introduction into web technologies. A modern web page is divided into the front-end and, where applicable, the back-end. We can also refer to the client-side and the server-side part of a web page.
In simpler terms, let's use an example. Everyday, most of us are on Facebook. What you see on your screen is the front-end and the back-end deals with all the logic of the web page. For instance, the database of all the users on Facebook is on the back-end. If you like a post, that request is sent from the front-end to the back-end, it is written to the database and it is returned to the front-end where it shows that you liked the post. Simple right?
Now, for purposes of this site and the projects we will be doing, we will focus on the front-end. On the front-end there are basically three technologies at work. Firstly, there is HTML, in which all of the contents of the website is written. Secondly, there is CSS which is responsible for the styling of the page and, finally, there is Javascript, which provides some logic on the front-end and makes the page interactive.
For this project we will just be building the page in HTML and CSS, with no Javascript at this stage. The form will therefore not be interactive, but this is a perfect project to illustrate the basics of HTML and CSS.
So what are we waiting for? Let's get coding!
Step 1:
To start off we open VSCode and we will be on the welcome page which I referred to in the previous lesson. You can proceed to close the welcome screen.
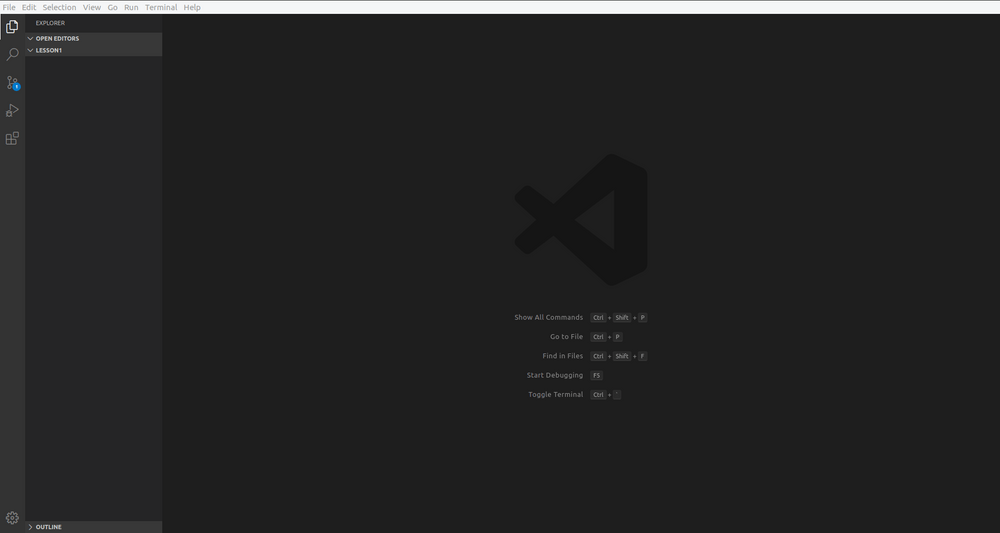
Now, somewhere on your PC, you can create a folder. It can be anywhere, it doesn't matter. You can also call the folder anything you like. Once the folder is created, open it and inside create another folder. I suggest we call this folder "Lesson 1". In that way we will have a folder for each project we build during the course of these lessons.
Once the folders are created we can go back to VSCode. In VSCode, click on File in the top left hand corner and select the "Open Folder" option. In the dialog window that opens, search for the "Lesson 1" folder we just created and select it to open the folder in VSCode.
Your screen should now look like the screenshot above.
Step 2:
Because we are only going to work with HTML and CSS, we have to create 2 files in our folder. To create these files, hover your mouse on the "Lesson 1" in the VSCode file explorer where 4 options will appear.
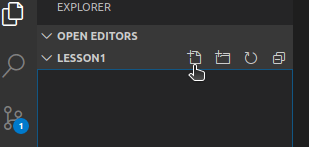
Like in the screenshot, we click the first option. A new file will appear in the file explorer, allowing you to name the file.
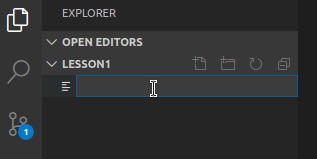
In the box that appears, we can type index.html. That will be the homepage of our "site". You can call this file anything, but, generally, this file is called "index.html".
After the name of the file is entered, the file will open on the code editor. Once this is done, repeat this process, but name the new file "style.css". Once this is done, you should have 2 files, "index.html" and "style.css".
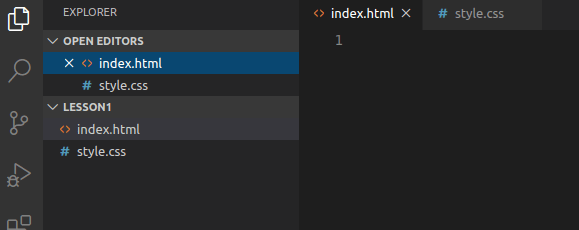
You'll see in my editor, I have the 2 files and both of them are open, with the active window in the code editor being "index.html". In the open "index.html" file, type the following:
html
Once you type the above, VSCode will suggest certain completions.

In the suggested completions, select the following option and press enter.
html : 5
After pressing Enter VSCode will provide the boilerplate that we will use for our project. A boilerplate is a code template provided by the code editor which enables us to type code faster without typing all the code every time. In our case the boilerplate looks like this.
<!DOCTYPE html>
<html lang="en">
<head>
    <meta charset="UTF-8">
    <meta name="viewport" content="width=device-width, initial-scale=1.0">
    <title>Document</title>
</head>
<body>

</body>
</html>
So what does this all mean? Line 1 of the boilerplate shows us that this is a HTML document. All the text between the < and > brackets are called HTML tags and they identify certain parts of our web page.
On line 2 you will notice the first tag that looks like this:
<html lang="en">
This first tag is called the opening tag and you will notice in line 11 that there is another tag which is the closing tag. In a closing tag the name of tag is preceded by a forward slash.
</html>
All the contents of our page is between the opening and closing tags. In between these tags we have the head and body tags. The HTML head is the first section in the code that contains information about a web page's properties and links to external related files. We will see that in action while we build our login form.
To illustrate this, in the explorer window in VSCode, right click on the index.html file. In the box that appears, select the "Copy Path" option. Open your web browser and in the web address bar, right click and paste the path to the file.
Once you press enter, the page will load. You will note that the title on top of the page will show "document".

In your HTML file, change the text between the title tags to "Spotify Login Screen".
<title>Spotify Login Screen</title>
Save the file in VSCode by clicking File --> Save or pressing Ctrl + S. Go back to the browser, refresh and now the title will show "Spotify Login Screen".

The HTML body tag contains all the information displayed on our page. In other words, all of our code relating to the login form will be between the body tags.
Now that we have our boiler plate, we can begin building the elements of the login form.
Step 3:
Let's think for a moment what elements we have in the login form. If we look at it, the first thing we see is the heading on the top of the form. Below that we have the "Sign In" and "Sign Up" text. What would this be? This would be a paragraph.
Below that we have the fields to enter the username and password. In normal day to day life, what do you have where you have to enter your details? Yes, a form.
Below the form, we have the "stay signed in" checkbox. What will the checkbox be? The checkbox is an input into the form. Below the checkbox we have the "Sign In" button. What element this will be is self explanatory. Lastly, we have another paragraph, with the text "Forgot Password?".
Luckily for us, HTML has tags for every part of the login form. For us to code the login form, we have to use these tags. Our web page will have the following tags between the body tags (Do not include these body tags). Please remember to type the code yourself and not copy/paste everything I do. You learn most by doing. You will also notice that if you enter, for example h1, that VSCode will suggest the h1 and on pressing enter, the h1 tags will be auto completed.
<body>
    <h1></h1>
    <p></p>
    <form>

    </form>
    <button></button>
    <p></p>
</body>
The h1 tag is the heading, the p tags are the paragraphs, the form tags contain the contents of the form and the button contains the button. If you save the file and refresh the browser, you still won't see anything. That's because, although we have the tags, we don't have any contents inside our tags.
So let's do that. We'll start with the heading. Between the h1 tags, enter the name of the form like in the example. In all of the examples the text between the /* and */ are called comments and they are ignored when the page is displayed. In these examples I use them to show where we make changes.
<body>
    <h1>Spotify</h1>  /* Enter Spotify here */
    <p></p>
    <form>

    </form>
    <button></button>
    <p></p>
</body>
Between the p tags we will enter the text as in the example. Something to note here is that we will place the text in their own tags within the p tag. The reason for this is that both the "Sign In" and "Sign Up" parts will be separate elements which can be styled separately. To achieve this we will place them in span tags.
<body>
    <h1>Spotify</h1>
    /* We place the text in two separate span tags */
    <p><span>Sign In</span><span>Sign Up</span></p>
    <form>

    </form>
    <button></button>
    <p></p>
</body>
Now the form tag. Inside the form tag we need the 3 inputs. First we add the 2 text inputs for the username and password.
<body>
    <h1>Spotify</h1>
    <p><span>Sign In</span><span>Sign Up</span></p>
    <form>
        <input type="text"> /* We add the text inputs */
        <input type="text">
    </form>
    <button></button>
    <p></p>
</body>
Below the two text inputs we add the checkbox, which is also an input, but in this case the type is not "text", but rather "checkbox". The tags remain the same, and only the type differs.
<body>
    <h1>Spotify</h1>
    <p><span>Sign In</span><span>Sign Up</span></p>
    <form>
        <input type="text">
        <input type="text">
        /* Add the checkbox */
        <input type="checkbox">
    </form>
    <button></button>
    <p></p>
</body>
If you save now and refresh your browser you will notice that the text boxes and the checkboxes are all on the same line. If you look at the example, we want each of them on its own line. To solve this problem we place a br tag after each input. The br tag causes a line break and gives every input its own line. You will also note that the br and input tags have no closing tags. Some tags in HTML have no closing tags, but we will deal with them as we go along.
<body>
    <h1>Spotify</h1>
    <p><span>Sign In</span><span>Sign Up</span></p>
    <form>
        <input type="text"><br>
        <input type="text"><br>
        <input type="checkbox" name="" id="">
    </form>
    <button></button>
    <p></p>
</body>
If you save the document now and refresh the browser, you will notice how each input is on its own line. If we look at the example, we also have to add text to the checkbox. We do this by placing the checkbox between two label tags and adding the text we want as label.
<body>
    <h1>Spotify</h1>
    <p><span>Sign In</span><span>Sign Up</span></p>
    <form>
        <input type="text"><br>
        <input type="text"><br>
        /* We place the input between to label tags */
        <label><input type="checkbox" name="checkbox" id="checkbox">stay signed in</label>
    </form>
    <button></button>
    <p></p>
</body>
At this stage we need not concern ourselves with the type, name and id fields in the checkbox. We will deal with them when we style the login form. The most important part at this stage is that the input tags be wrapped in label tags as in the example.
Next we move on to the button. For the button, at this stage we just have to add the text between the button tags.
<body>
    <h1>Spotify</h1>
    <p><span>Sign In</span><span>Sign Up</span></p>
    <form>
        <input type="text"><br>
        <input type="text"><br>
        <label><input type="checkbox" name="checkbox" id="checkbox">stay signed in</label>
    </form>
    <button>SIGN IN</button> /* We add the text between the button tags */
    <p></p>
</body>
Lastly, we just have to add the text between the last paragraph tags.
<body>
    <h1>Spotify</h1>
    <p><span>Sign In</span><span>Sign Up</span></p>
    <form>
        <input type="text"><br>
        <input type="text"><br>
        <label><input type="checkbox" name="checkbox" id="checkbox">stay signed in</label>
    </form>
    <button>SIGN IN</button>
    <p>Forgot Password?</p> /* Add text between the paragraph tags */
</body>
That's it! Except for the styling our form is done. If you followed the lesson exactly and didn't make any typos (it happens easily), your pages should look like this after you have saved and refreshed your browser.
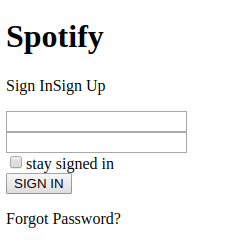
It doesn't look very exciting or pretty at this stage, but for our next lesson we will be doing the styling of the form to make it look more like the example.
Till later....
